In my last blog post, Letter Names and Clefs Part One, I talked about one half of the moving towards letter names and clefs: moving from black keys to white keys, using independent fingers and hands together. Read it here if you missed it. Let’s go back to my other starting point, the musical alphabet.
Alongside the work on introducing do re mi on the white keys, we can introduce the musical alphabet. We can play a game where the student steps up the white keys while saying the musical alphabet (more below).
It’s much easier to introduce the musical alphabet on a full sized piano than on a smaller keyboard. Why? Well, what’s the starting letter of a normal standard piano? A! Smaller keyboards often start at F and some start on C.
The game of stepping up the keys and saying the musical alphabet is verbal learning. Our students will be thinking about the fact that the piano goes from low to high horizontally and reinforcing that they’re stepping up the keys. Do re mi are steps apart and stepping up the white keys, but we really want them to memorise the alphabet string.
Here’s the game:
They sing and play: “a b c d e f g-, a b c d e f g…..” all the way up the piano. Pausing on G gives them thinking time to get back to A and they get musical memory of it being a 4 beat pattern and easier to achieve. Make sure they say the right letters out loud as they go up the piano. They must play the keys as well! Get them to make some music!
They love this game if they can do it. You can add in a duet once they’re past the keys you need to play. They absolutely LOVE this! I have found that even when they know the musical alphabet really well on the piano and they don’t need to do this activity, they still ask for it.
Next stop: Landmark Notes
Landmark notes, F G and C, are very important – we need to get them embedded really early.
A lot of piano teachers use C first, but I don’t. F is next to 3 black keys and there’s more chance of your student getting the answer right when you ask them to find it. If you say C is next to 2 black keys, F is also next to 2 black keys and it takes a bit more explaining!
I play a game with my students where we find all the Fs. First of all they play up the keys and count up saying,
“A B C D E F…! put a friend on it! G! A B C D E F….!! Put another friend on! G….”
I like them to swap hands half way through the activity, so they’re reaching with their other hand.
Depending on how old they are or how quickly they pick things up, you might say,
“whoa! Stop! Can you see a pattern? Maybe you don’t need to count to see where the next F is”
Most of the time they need to count all the way to the top and then we’ll step back and see whether they can see a pattern. Hopefully they’ll discover that F is before 3 black keys. You could lead them to have a look at the black keys, “what do they all have in common?”.
I then ask them to count how many Fs, they answer 7, then I steal an F! The student plays all the Fs again and they have to make sure they find all 7 even through I’ve stolen one. I take a toy off one at a time, or two at a time if they’re confident, until there are none and they have to find all the Fs with no toy markers. You can also ask them to do this at home using Lego, mini figures…. anything that will fit on the piano keys.
The next step is,
If you want to, you could ask them to find the Cs next instead… Sometimes I do the Cs instead of Gs. They’ll then say they want to find all the Ds and Es although I don’t ask them to do this unless they volunteer it because I want to embed those three special notes and make it clear those 3 notes are special.
A note on the term Landmark Notes: our students might not know what a landmark is, so we need to show them what one is. I’ve talked about Big Ben, the Eiffel tower etc.. “If you open your eyes and you can see Big Ben you must know you’re in London or pyramids you know you’re in Egypt.” I’ve recently started using landmarks in their area: their house, school and big Tesco on the corner… and tell them they’re places that they’re really good at finding.
Another great game to play later is the 12 bar blues. It uses all 3 landmark notes if we play it in they key of C. While playing the 12 bar blues you can say “C F and G” or “home, school, shops” to help them find the 3 notes. It’s a very exciting musical way to find the Cs Fs and Gs.
Now it’s time to talk about Tonics
When we move our pattern around, they’re not always going to be do re mi.
To allow our students to explore this, we can ask them to put toy markers in every single place and see where it works. Make sure you don’t say “put do re mi here” when the lowest marker is on E because it’s not accurate; it’s mi fa so or ti do re.
Once we’ve introduced C, F and G, I start talking about tonics. I tell my students that the last note of the piece is the tonic, the boss note, the Mr Johnson headteacher of the school. The dominant is the deputy head… although one child names the school administrator as the deputy and I thought, yes she probably is!
When exploring different moods and tonalities, we’ll always be accurate if we talk about the tonic.
Then we need to do our “friendly tonics”! That’s how I’ve been describing C, G and F.
When we play Hot Cross Buns or I love Cats with a tonic of C, F or G. It sounds correct. When we use the tonic of D, B, A or E… it’s weird!!! It’s not really unfriendly… really we should say light and dark… I don’t like saying major is happy and minor is sad, we have more colours and emotions than that. You can have a sad major song and a happy minor song… maybe instead major and minor can be described as friendly against mysterious…
Once you’ve done this activity, every song you’ve ever done can be transformed into a freaky version! E.g Burnt Cross Buns, Frogs are Falling Down, Scary Mary Had a Snake! They explore the sounds and judge which one it is.
Next, we need some more terminology because we’re going to start talking about clefs.
Treble and Bass Clef
We don’t want the first time we mention these to be at the same time as drawing a mad symbol and saying what line it has to be on. We’ve got to do something else to help!
So I draw them a little picture like this:
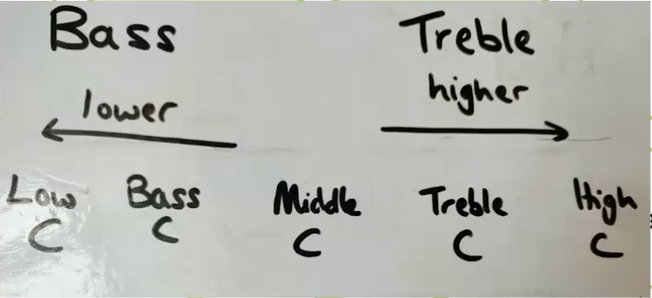
My student and I draw this together on a whiteboard. They’re amazing at finding the landmark notes and realise that we need to give them more names. There are 8 Cs on the piano and we need to know which one we’re talking about. Bass is easier because they’ve probably heard about bass guitar and bass drum. Treble is harder because they don’t have this word in their vocabulary, so it’s just thew opposite of bass. Say in a low voice “where are the bass notes?” and “where are the treble notes?” in a high voice.
I have invented names for Cs lower than Low C… “super low C”! and “Super high C” and “secret C” because nobody knows it’s a C because it’s not next to 2 black keys.
The 12 bar blues is great for reinforcing the Cs. We put the 12 bar blues groove on and they have to play a C at the beginning of each bar. Even where the chord changes, C mostly works still. Then they can play any C! Then they have to name to C they’ve played. We’re getting the idea that bass is low and treble is high. And of course from the very first lesson we call their hands “high hand” or “low hand” and we’ve reinforced this concept before we get to the grand staff.
We also need to make sure we talk about treble G and bass F ready for when we introduce clefs…
Clefs
This is the part that it gets hard. At some point we have to take the plunge!
We already know treble is high and bass is low and the clefs are sign posts. We’ve only got one piece of new information to give: the shape of it and where it goes. I say,
In the olden days they wanted to show which of these lines is F, so they used to label it “F” and the sticks of the F go either side of the F line. Because they’re artistic and flamboyant they make it look fancy and eventually it turned into what the bass F looks like today. So everyone that looks at this bass clef knows the line note on the F line is bass F. This is our bass F line. Find Bass F on the piano.
I then find Hot Cross Buns in Sing and Play which is written on a clef-less stave in bass F position and write on a bass clef and say,
When this bass clef is there, instead of playing it anywhere we like, it’s saying we’re in F do.
Going forwards, whenever they write a bass clef, I get them to write a note on the F line too.
Then we do the same with the treble clef. The swirl of the treble clef tells us where treble G is, not just any G!

Grand Staff
Here’s how I present the grand staff:
There are so many notes on this piano! Too many for just 5 lines. Let’s join two together! It’s still not enough for the whole piano but at least we get more.
I don’t tell them the top stave is treble and bottom stave is bass because it isn’t always, I call the top stave the high stave, that uses the high hand and bottom the low stave which uses the low hand.
Then pop the clefs on and away we go!
Middle C
If we count in from bass F and treble G, we land on middle C!
That’s when I present middle C on the stave and that it has its own ledger line in the middle of the two staves!
What’s next?
We move onto Going Wild and Let’s Play!
The longer and more often you can do these activities alongside the Doremi activities, the better it will be the transition to letter names and clefs will be and your students will have a really deep understanding.
Let me know how you get on with it!
Want more advice and ideas?
If you found this blog useful. Please comment below if you did or if there is anything you would like to say to me about it. If you’d like to find out more about preparing your students for pitch and much more, including over a year’s worth of lesson plans for teaching all the important musical skills with Helen’s clear microsteps, why not try out Doremi Membership for 14 days for just £1?